Bizify
Designing a mobile ERP prototype for a business owner in the UAE
The Problem
The client was running multiple retail stores across the UAE, each with its own set of processes and data. With no central system to track performance, they struggled to make informed decisions. I was tasked with designing a comprehensive ERP solution to consolidate operations, enhance reporting, and streamline workflows.

Challenges / Constraints
Short Timeline
The client needed the solution delivered in two weeks to present to their management. As a solo designer with limited domain knowledge and no time for user research, I had to quickly create a prototype based on their vision, balancing speed and functionality.
Complexity
The client knew they wanted an ERP system but lacked clarity on its structure, functionality, and interactions. They had a broad concept in mind but needed guidance in defining the system architecture and handling the complexities of ERP design. My role was to translate their vision into a structured, interactive solution that effectively addressed their business needs.
Lack of Domain Knowledge
Without prior knowledge of the retail business, I had to quickly grasp the complexities of the industry. The challenge was to design a system that met business needs while learning about the intricacies of retail operations as I went.
The Process
Conceptual Modelling
To overcome my limited domain knowledge, I mapped out all the core concepts and actions in a spreadsheet. This exercise helped break down the system’s complexity and provided a clear starting point for the design.
Step 01: Identify key domain concepts, their attributes, and associated actions.
I spoke with the client to understand the functionalities they wanted, then mapped out key domain concepts, attributes, and actions. This provided a clear system overview and a structured vocabulary for communicating design decisions.

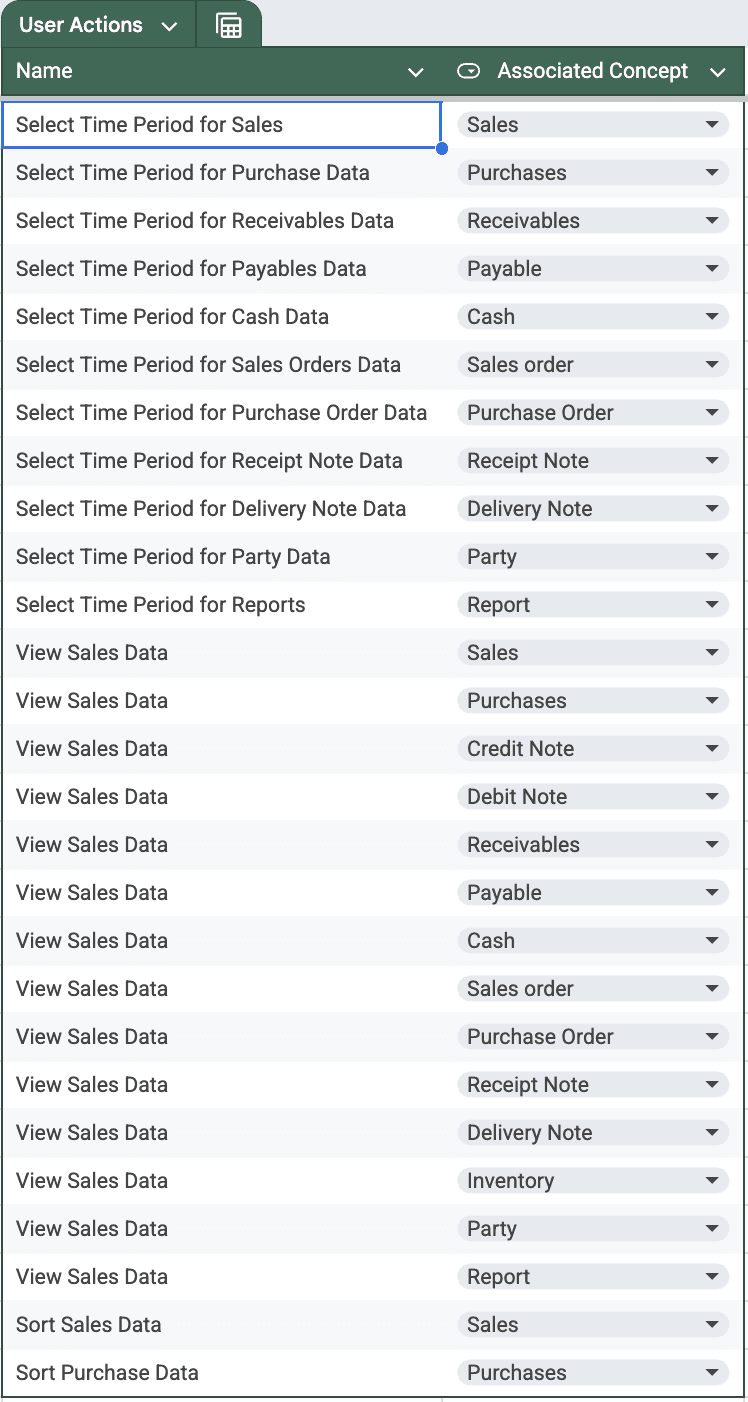
Step 02: Identify actions that overlap across different domain concepts.
After mapping out domain concepts, attributes, and actions, I analyzed how many concepts shared the same actions. This helped consolidate views, ensuring a consistent user experience and reducing cognitive load. In this case, 11 concepts required selecting a time period, and 14 involved viewing data. As a result, I designed two primary views—one for selecting a time period and another for viewing data—allowing for a scalable and intuitive interface.

Step 03: List all the user actions needed in the system
After identifying the required views, I listed the actions that needed to be designed to enable those views and functionalities. This helped document the project scope, minimizing potential misunderstandings or miscommunications between the client and me.
Wireframing
Once all the user actions were listed, I had a clear roadmap for the design process. The next step was to develop concepts for the views and actions outlined in the spreadsheet.
Step 01: Designing the wireframes for the views
I focused on designing the two main views first, as they would be shared across multiple concepts. This allowed me to reuse the designs for relevant actions. To develop these views, I started by wireframing them for one concept—in this case, sales—since it provided a clear starting point for the overall design.

Step 02: Client feedback
After designing the wireframes for the three main views, I presented them to the client, explaining how they would be extended to other concepts. This approach saved time by reducing back-and-forth iterations, allowing me to efficiently incorporate feedback and apply it to all relevant actions across the system, benefiting both the client and myself.
Step 03: Integrating the views into all user actions for each concept
Once the client approved the wireframes, I extended them to cover all relevant user actions for each concept. With the client’s sign-off, I was able to quickly and efficiently implement the additional functionalities, ensuring a smooth workflow and timely progress for the system.
Step 04: More client feedback
After designing the wireframes for all concepts and user actions, I conducted a final round of feedback to ensure everything aligned with the client’s requirements. In under two days, I designed almost 60 frames, thanks to the efficiency of the conceptual model and modular wireframes. Once the client approved, I moved on to bring the design to life.
High-Fidelity Prototyping
With the concepts mapped out and wireframes finalized, the focus shifted to transforming the design into a functional, interactive experience. This phase was about refining visual details and adding the finishing touches to bring the system to life.
Step 01: Established the styles and the grid for the design
I usually start by establishing color styles, typography, type scale, and layout grids for the design. Normally, I collaborate with the client to explore these ideas, but due to the project’s tight timeline, I kept the design simple and focused on meeting the core requirements effectively.

Step 02: Leveraged iOS native UI components and SAP Fiori components to quickly prototype the concept
Due to the tight project deadline, I couldn’t design components from scratch. Instead, I utilized existing design systems and UI components, which allowed me to accelerate the prototyping process and meet the project’s requirements efficiently.
Through market research, I found that SAP’s ERP system aligned closely with the domain I was designing for. Leveraging their established design patterns, I created a prototype that would cater to similar use cases. Since the app was intended for the Apple ecosystem, I used iOS native components to ensure the design was easily implementable, relying on well-documented UI kits from both SAP and Apple for seamless integration by development teams.

Step 03: Wired up the interactions
Step 04: Client Feedback and Approval
At this stage, the client only requested minor cosmetic changes as they understood the design process. Once they approved, I began preparing assets for development handoff. With the development team closely involved in design decisions, the back-and-forth was minimal, ensuring a smooth transition from design to implementation.
The Outcome
The final design successfully streamlined the client’s ERP system, making it easier to manage multiple retail stores across the UAE. With a clear, intuitive interface, the system improved real-time business visibility and operational efficiency. The use of established design patterns and iOS native components ensured a smooth development handoff, minimizing back-and-forth between teams. Despite the tight timeline, the project was completed on schedule, fulfilling the client’s needs and offering a solid foundation for future growth.
Learnings
There is no perfect design process
This project highlighted that while it’s tempting to follow a perfect, one-size-fits-all design process, each project’s unique constraints require flexibility. I learned to adapt my approach to meet specific needs, ensuring a balance between design standards and the practical realities of the project.
Adaptability is Vital
Creativity isn’t just about generating great ideas—it’s also about knowing how to adjust the design process to deliver the best results for each unique project. Adaptability is key to finding solutions that fit both the vision and the practical constraints.
Conclusion
Despite the challenges of a tight timeline, lack of user research, and domain complexity, the conceptual modeling approach allowed for a structured design process. By mapping out domain concepts, attributes, and actions, a scalable and intuitive ERP system was designed that met the client’s needs. This project reinforced the value of rapid problem-solving, adaptability, and clear communication with stakeholders. While further iterations could refine usability, the solution provided a strong foundation for business visibility and operational efficiency.